Unlock Runny Yolk Perfection: Over Easy Eggs for Any Meal
Ah, the humble egg. A staple in kitchens worldwide, it offers an incredible array of culinary possibilities. While scrambled eggs have their fluffy charm, and sunny-side-up eggs flaunt their glistening yolks, there's a particular darling that stands out for its elegant balance and irresistible appeal: over easy eggs. Imagine a perfectly cooked egg white, firm yet tender, encasing a warm, liquid gold yolk, all sealed with a delicate, quick fry on both sides. It’s the ultimate expression of runny yolk goodness, offering a delightful richness to any dish.
For many, the thought of preparing over easy eggs can be intimidating, conjuring images of broken yolks and messy flips. But fear not! This comprehensive guide will demystify the process, transforming you into an over-easy egg master. We'll explore the essential techniques, clever tips, and the art of the perfect flip, ensuring you achieve that coveted runny yolk every single time. Get ready to elevate your breakfast, brunch, or even dinner with these delectable, easy-to-make eggs.
The Allure of Over Easy Eggs: Why They're a Culinary Delight
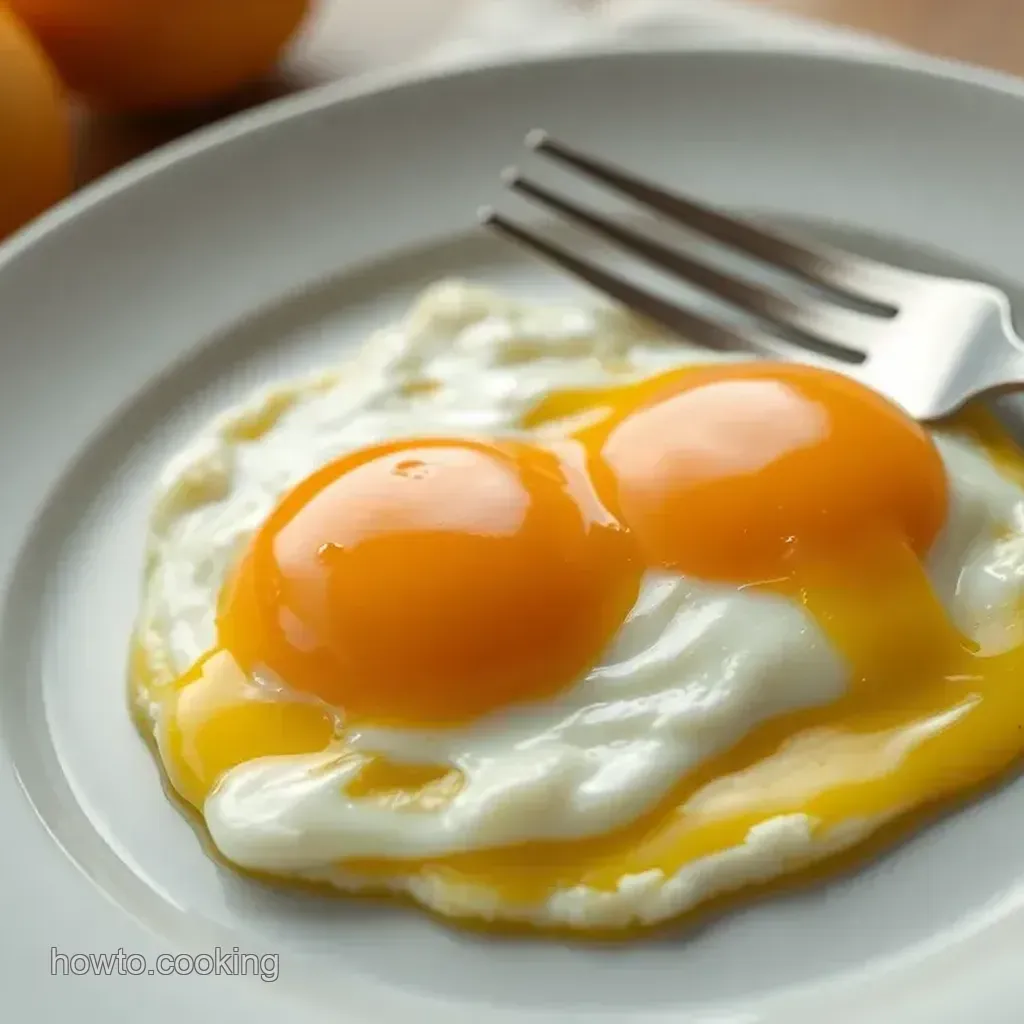
What is it about over easy eggs that garners such fervent devotion from chefs and home cooks alike? It’s a combination of texture, flavor, and sheer versatility that makes them a true kitchen hero. Unlike sunny-side-up eggs, which leave the top of the yolk uncooked, over easy eggs receive a brief, gentle kiss of heat on both sides. This creates a thin, delicate film over the yolk, providing a sealed, less messy presentation while preserving all the luscious, liquid center.
The magic lies in this delicate balance. The whites are set and fully cooked, offering a satisfying chew, while the yolk remains wonderfully runny, ready to burst forth and mingle with other ingredients. This "sauce" effect is what makes over easy eggs so incredibly adaptable. Picture it: the rich, creamy yolk cascading over a slice of Mastering Over Easy Eggs: Perfect Flipping & Runny Yolks avocado toast, soaking into crispy hash browns, enriching a hearty breakfast sandwich, or even topping a gourmet burger. It adds a layer of indulgence and flavor that is simply unmatched. It's this unique combination of practicality and decadence that secures over easy eggs' place as a favorite among fried egg connoisseurs.
Mastering the Basics: Essential Tools and Ingredients for Perfect Over Easy Eggs
Achieving perfect over easy eggs begins before you even crack an egg. The right tools and careful preparation of ingredients are paramount to success. Here’s what you’ll need and why it matters:
- The Pan: A high-quality nonstick pan is your best friend. Its smooth surface prevents sticking, which is crucial for a clean flip and an intact yolk. A pan with slightly sloped sides can also make sliding the spatula underneath easier. Ensure your pan is appropriately sized – a 8-10 inch pan is ideal for 1-2 eggs, preventing overcrowding.
- The Fat: A small amount of cooking fat is essential for flavor and to prevent sticking, even in a nonstick pan.
- Olive Oil: A popular choice for its flavor and availability.
- Coconut Oil: Adds a subtle tropical aroma and cooks well.
- Avocado Oil: A neutral flavor with a high smoke point, great for slightly higher heat if needed.
- Butter: Imparts a rich, classic flavor, but watch its smoke point closely to avoid burning.
- Lard: An old-school choice that provides fantastic flavor and a crispy edge.
- The Eggs: Fresh eggs are always best. Fresher eggs have tighter whites that hold their shape better, leading to a more aesthetically pleasing fried egg. While not strictly necessary, some chefs advocate for bringing eggs to room temperature before cooking, believing it promotes more even cooking of the whites and yolk.
- The Spatula/Turner: This is arguably the most critical tool for the flip. You'll want a thin, flexible spatula with a flat edge. A thin metal or silicone spatula works wonders for sliding under the delicate egg without tearing the whites or breaking the yolk. Avoid thick, clunky spatulas that can be difficult to maneuver.
- Heat Control: This is the secret sauce to over easy eggs. Resist the urge to crank up the heat! A low to medium-low heat setting (often around '4' on a burner dial) is ideal. High heat will cook the whites too quickly, causing them to bubble, become rubbery, and potentially burn around the edges before the yolk has a chance to warm properly. Slow and steady wins the race for even cooking and tender whites.
Step-by-Step Guide to Cooking Flawless Over Easy Eggs
Now that you have your tools and ingredients ready, let's dive into the art of cooking those perfect over easy eggs. Follow these steps for consistently delicious results:
1. Preheat Your Pan Gently
Place your nonstick pan over low to medium-low heat. Add 2-3 teaspoons of your chosen cooking fat. Allow the fat to heat up for a minute or two, ensuring it coats the pan evenly. You're not looking for sizzle, just a warm, slick surface.
2. Crack and Cook the Egg
Gently crack your egg directly into the preheated pan. If you're nervous about shell fragments, crack it into a small bowl first, then carefully slide it into the pan. This also helps keep the yolk perfectly centered. Let the egg cook undisturbed for 2-3 minutes. During this time, the whites will gradually set. You're looking for the whites to be mostly opaque and firm, but with a small, slightly translucent ring still visible around the yolk. This indicates it’s almost ready for the flip.
3. The Gentle Flip
This is the moment many dread, but with the right technique, it’s surprisingly simple. Take your thin, flexible spatula and gently slide it completely under the egg, making sure to free any parts that might be slightly sticking to the pan. Keep the spatula low to the pan, and with a quick, confident, and gentle wrist flick, flip the egg over. The goal is to minimize the height of the flip to prevent the yolk from breaking on impact. If you'd like a deeper dive into perfecting this motion, check out our guide on Mastering Over Easy Eggs: Perfect Flipping & Runny Yolks. While some alternative methods exist (like covering the pan with a lid or spooning hot water over the yolk), the true "over easy" technique involves flipping to gently fry the top.
4. The Quick Second Fry
Once flipped, the egg needs very little time. Cook it for just 20-25 seconds. This brief period is enough to create that delicate film over the yolk while keeping the center beautifully runny. If you prefer a slightly thicker, less liquid yolk, you can cook it for another 5-10 seconds, or until it barely wobbles when gently pressed. Be careful not to go too long, or you'll venture into "over medium" or "over hard" territory.
5. Plate and Season
Use your spatula to gently slide the egg off the pan and onto your plate, yolk side up. Immediately season with a pinch of salt and freshly ground black pepper, or any other seasonings you prefer (think paprika, chili flakes, or a dash of hot sauce!).
Troubleshooting and Tips for Over Easy Perfection
Even with a step-by-step guide, practice makes perfect. Here are some common issues and expert tips to help you consistently achieve flawlessly runny over easy eggs:
- Preventing Broken Yolks:
- Low Heat is Key: High heat makes the whites cook too fast and become brittle, increasing the chance of the yolk tearing during the flip.
- Thin Spatula: As mentioned, a thin, flexible spatula is crucial for getting completely under the egg without snagging.
- Confiden & Gentle Flip: Hesitation can lead to a clumsy flip. Be decisive but gentle.
- Don't Force It: If the egg is sticking, work your spatula around the edges to loosen it completely before attempting the flip. Never try to pry it up. For more detailed strategies on this, our article How to Cook Over Easy Eggs Perfectly: No Broken Yolks! offers excellent advice.
- Achieving Evenly Cooked Whites:
- Preheat Properly: Ensure your pan and fat are evenly heated before adding the egg.
- Don't Overcrowd: Cook one or two eggs at a time, depending on your pan size. Overcrowding lowers the pan temperature and can lead to uneven cooking.
- Monitor Closely: Pay attention to the translucency around the yolk. This is your cue for when to flip.
- Too Runny or Not Runny Enough Yolk:
- Timing is Everything: The 20-25 second rule post-flip is a general guideline. Adjust it slightly based on your preference. For extra runny, go for 15-20 seconds. For a slightly firmer but still gooey yolk, try 30-35 seconds.
- The Wobble Test: Gently tap the yolk with your finger or the side of your spatula. A truly runny yolk will have a significant wobble; a firmer one will be less responsive.
- General Tips:
- Listen to Your Pan: A gentle sizzle is good; an aggressive crackle means your heat is too high.
- Practice: Like any culinary skill, making perfect over easy eggs gets easier with practice. Don't be discouraged by a less-than-perfect first attempt!
Conclusion
The journey to perfecting over easy eggs is a rewarding one, transforming a simple ingredient into a culinary masterpiece. With its irresistible runny yolk, tender whites, and incredible versatility, the over easy egg is truly a breakfast, brunch, or dinner delight. By understanding the importance of proper heat, the right tools, and a gentle, confident technique, you can banish any fears of the dreaded flip and consistently achieve that golden, liquid perfection.
So, grab your nonstick pan and your thin spatula, and embrace the joy of cooking this classic. Whether nestled on toast, crowning a savory dish, or simply enjoyed on its own, your perfectly cooked over easy eggs are sure to impress and delight. Enjoy the journey, and most importantly, enjoy the delicious results!
